I'm the last one on the blogger~block to try the tissue paper project.
I love it! My first try turned out pretty good; but, next time I'm trimming just a bit closer to the image/words before applying onto mod-podge.
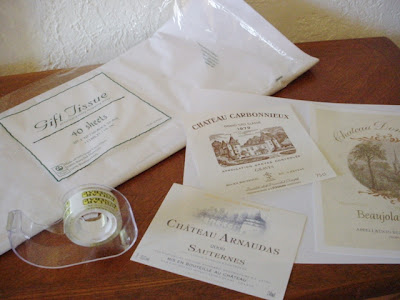
Here's my tissue paper, some images with French words and chateau's~~
Here's the images I want to copy onto the tissue paper~~
Using a plain piece of copy paper and taped the tissue around it; leaving about 1/2 inch on sides to tape to the paper;
After printing out my images on to the tissue sheet~~
I cut out the images I want to use on my white painted wooden lid~~
Using mod-podge as a glue~~gently apply just the tissue portion after cutting out the image being used~~let dry then apply top coat of mod-podge.
I used several layers of the mod-podge (dry between coats) then lightly sanded; added one more coat of mod-podge; this gives the effect of the words "printed" on the wood piece~~
I am so in love with my Keurig Coffee-maker~~this project holds my favorite brand: Donut House coffee!
I bought the storage jar for $1.00 at CC~~with all the intentions to sell at the booth~~but keeping this one for me. Will show some other projects with this technique later this week~~
~~See you at these fabulous parties~~


No...you are not the last gal out there to try this...that would be ME!!! It's on my list...just need more time in a day:) Your $1 makeover needs to come right over to NTT.
ReplyDeleteBlessings,
Linda
I haven't tried this either. But I'm going to after seeing your awesome results!
ReplyDeleteI have only tried this with candles and stamps-no printing was involved...but I love it! Yours turned out great!
ReplyDelete~Trisha
I'm another one who hasn't tried this yet - it looks fantastic!! Was that knob already attached to your lid?? I have a jar just like that but no knob - wonder if I could glue one on...
ReplyDeletehmmmm, can't wait for your details!
This is so great! I'm gonna try this asap!
ReplyDeletexoxo
Myric
I really need to try this. it always looks so nice
ReplyDeleteNice project, I will have to try this technique.
ReplyDeleteCiao,
Mary
Sorry to say, you aren't the last one! I love this and I can't wait to try!! Thank you!
ReplyDeleteGREAT project!
ReplyDeleteRene'
What a great idea!! Who thinks of these things? You are not the last one to try it, as I havent even heard of it. I have now, and will be making something fabulous!! show us what else you make.
ReplyDeleteHugs,
Debbie
Wow - can't believe I didn't know about this either. I love how your project turned out, definitely going to try this- thanks so much for posting it.
ReplyDeleteHi, I have not tried this either, but I have a question. You didn't have any trouble with the tissue paper tearing and getting jammed in the printer? That is the only thing that I'm afraid of. Your project turned out incredible, it is so pretty, I want to try this too. Just don't want to jam my printer. Looking forward to your feed-back. Connie :)
ReplyDeleteTo Connie: I taped my edges down pretty good on the reverse side of the paper--I, too, had reservations about running in through the printer but it worked beautifully. There shouldn't be any problems if you take care in taping down the tissue--its very thin even on the paper, so it will run through easily. Or you could try in on your friend's printer first (just teasing). Thanks for all the comments!
ReplyDeleteLovely project that turned out so well! I have been wanting to try this for quite some time and you have inspired me to get going and do it.
ReplyDeleteGreat instructions!
I love how you made the jar so much more pretty by adding this design to it. I would never have thought of that. Very cute and clever.
ReplyDelete